

How to Set Up Live Sessions in Your Course: Plan, Host, Record
Live sessions give us a simple way to run live learning directly inside a course. Instead of piecing together separate tools for scheduling, hosting, notifications, learner access, and recordings, we can manage everything in one place.
That makes teaching easier to organize and easier to scale. It also gives learners a clear hub where they can join sessions, stay on top of the schedule, and come back to recordings later.
Why Live Sessions matter inside a course
When live learning is built into the course experience, the workflow becomes much cleaner. We do not need to send learners across different platforms or manually connect each part of the process.
With Live Sessions, the goal is simple: plan, host, and reuse live learning from one central place. That means we can:
Schedule upcoming sessions from inside the course
Give learners a clear place to access live events
Keep notifications and session management connected
Use recordings later so the session continues to add value
And that is the real benefit. Live teaching becomes easier for creators and more engaging for learners.
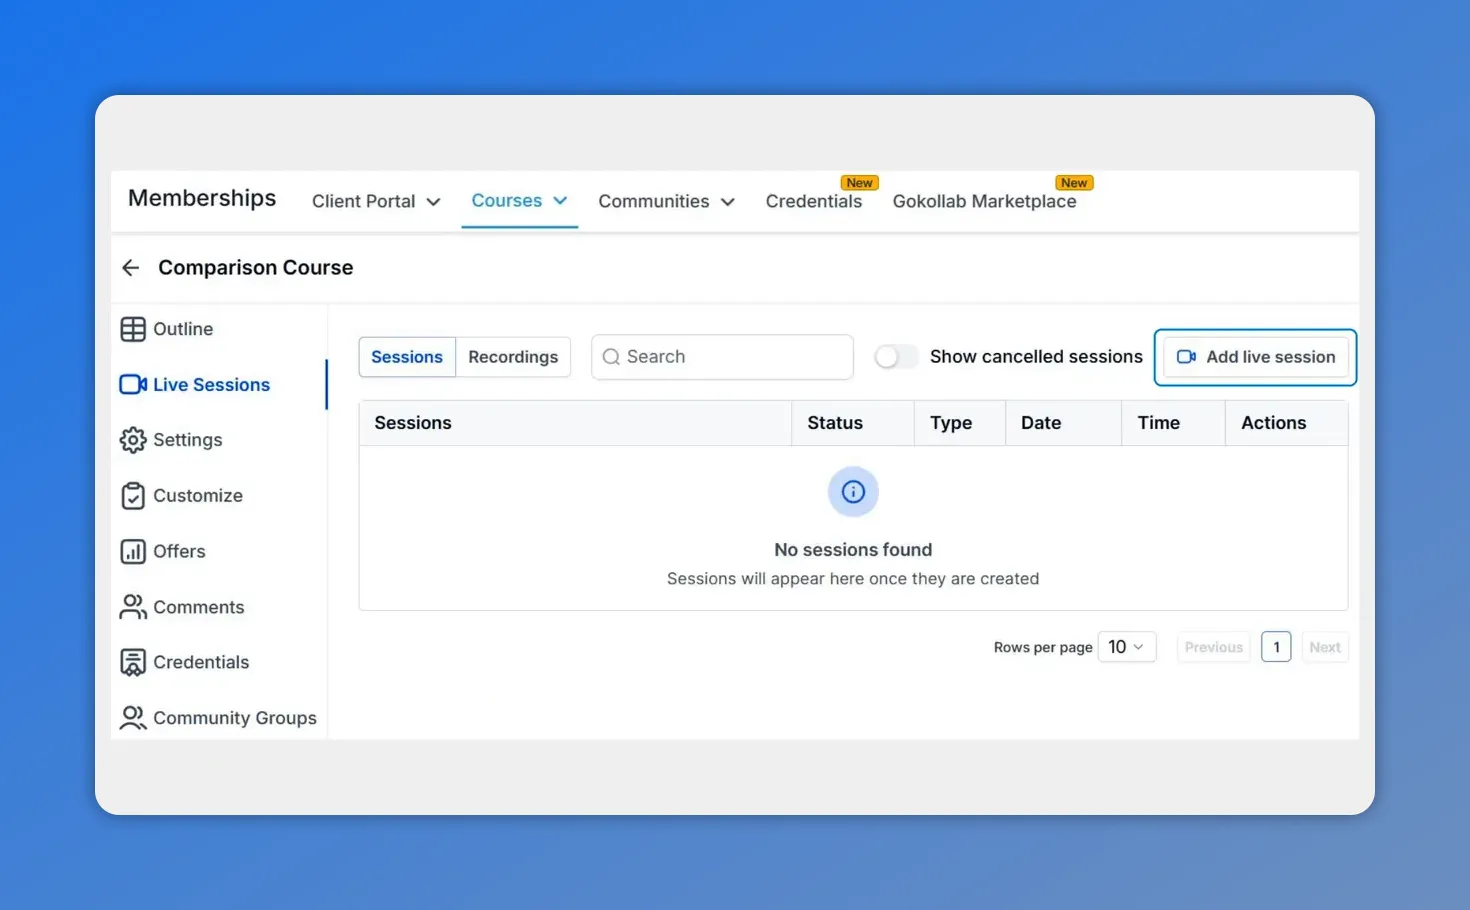
In the course builder, go to the Live Sessions area to view sessions and add a new live session.
Where to create a Live Session
Everything starts in the course builder.
Go to the Courses product tab.
Create a new course or open an existing one to edit it.
Switch to the Live Sessions tab.
Click Add Live Session in the top right corner.
That opens the setup flow for the new session.

In the course builder, the Live Sessions tab shows the sessions table and the “Add live session” button—this is where your upcoming sessions will appear after creation.
Name the session and add a thumbnail
The first step is basic session setup.
Enter a session name that clearly tells learners what the live event is about. If you want, add a thumbnail as well. This is optional, but it can help the session stand out inside the course and make the schedule easier to scan.
Once those details are in place, click Next.
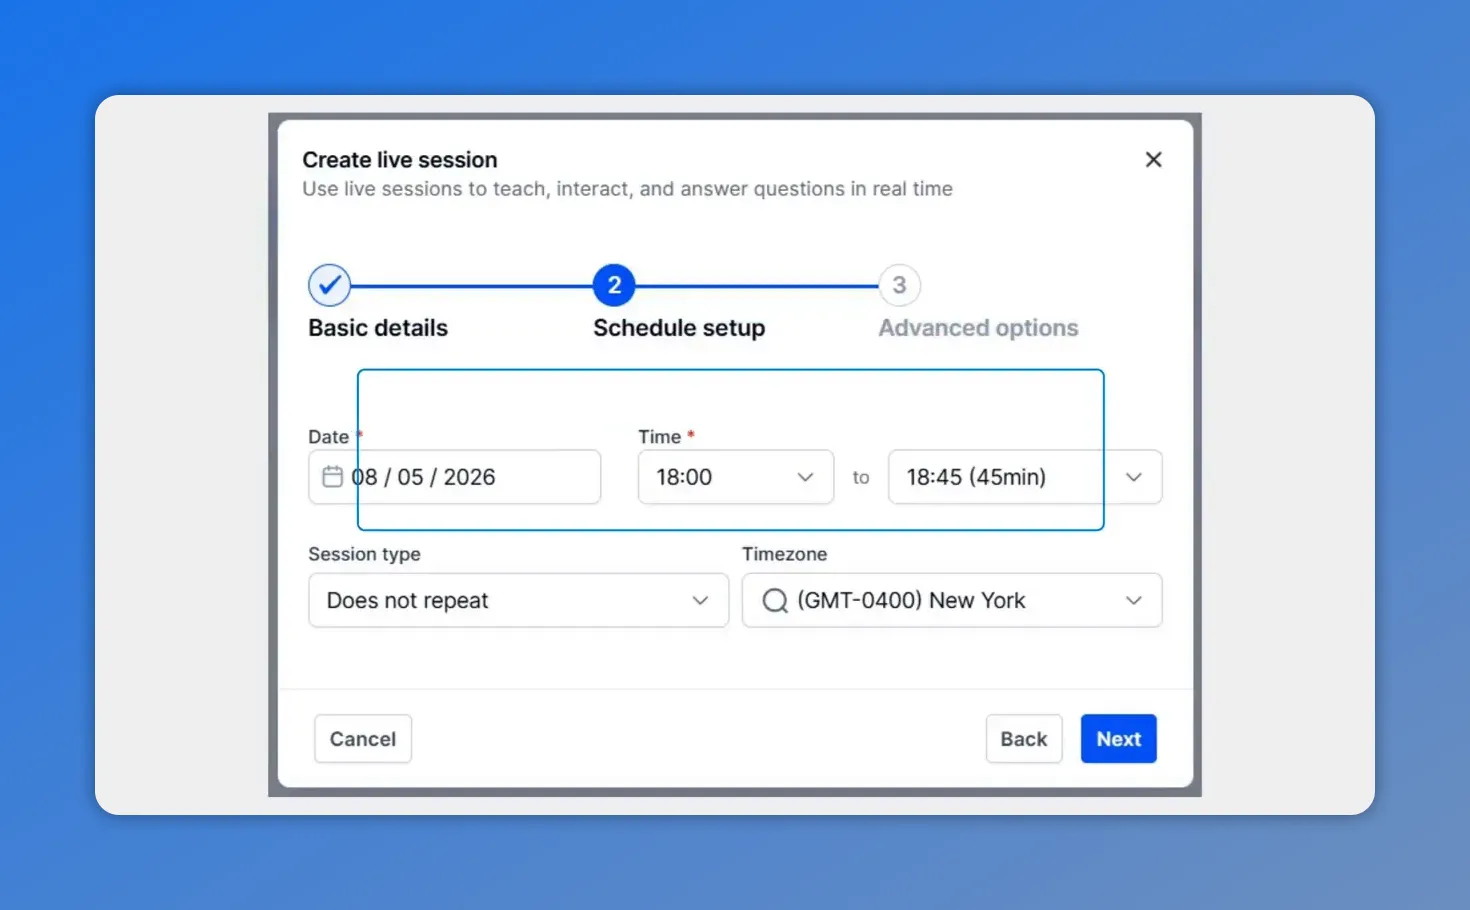
In Schedule setup, define the date and time window, choose whether it repeats, and set the timezone so learners know exactly when to join.
Set the date and time details
Next, choose the session timing.
This is where we define when the live session happens. Add the date and time details, then click Next to continue.
If we are building a live teaching schedule, this step is what turns the idea into an actual event learners can prepare for.
The video description also highlights an important benefit here: Live Sessions can support both one-time events and recurring sessions. That gives us flexibility whether we are running a single workshop, weekly office hours, or an ongoing live training series.
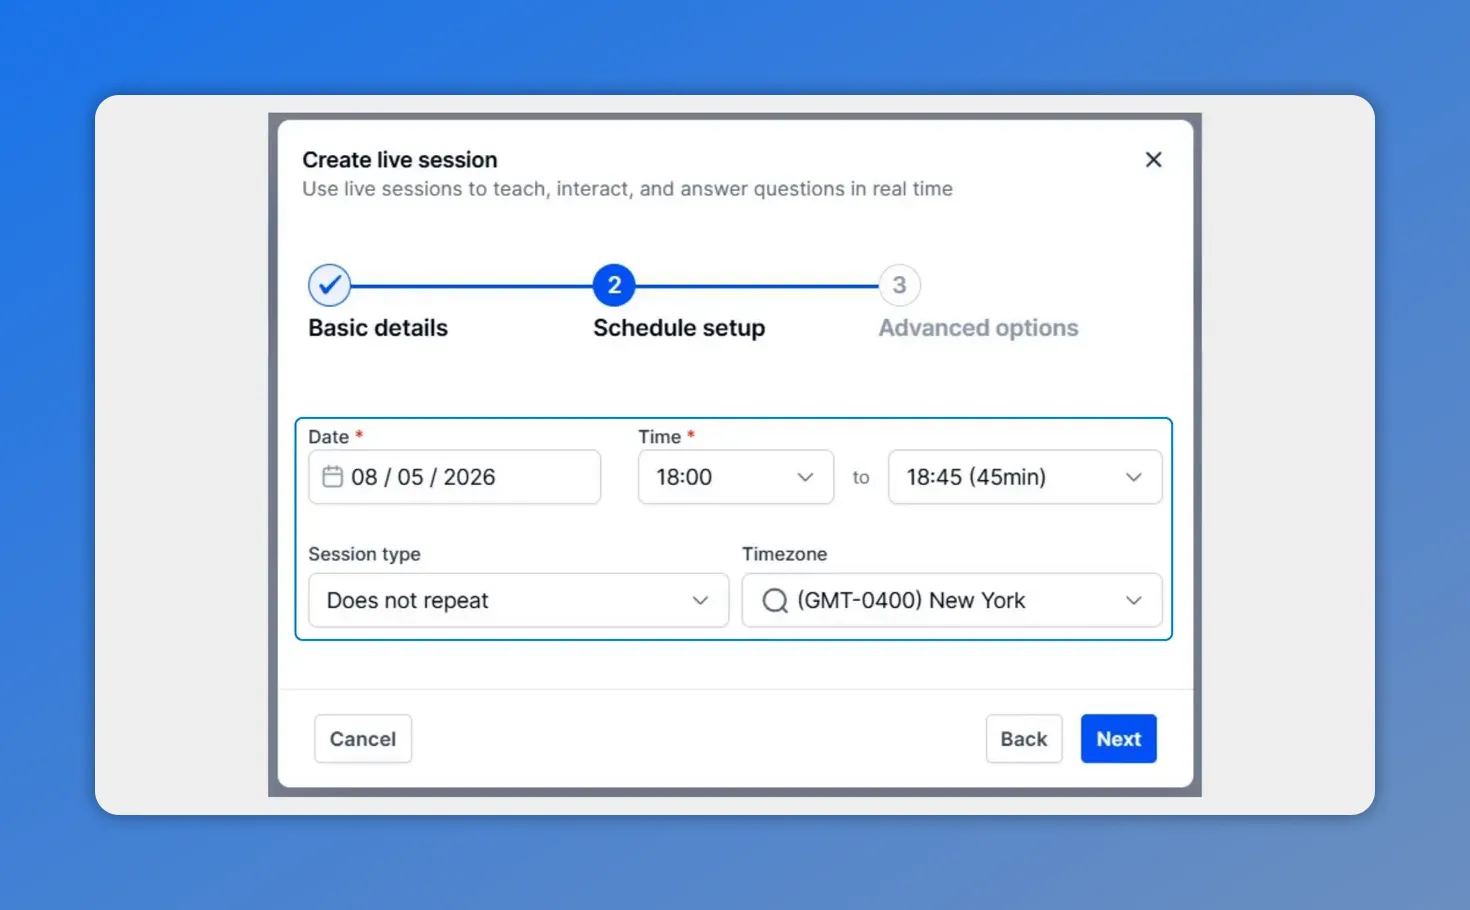
Set the date, time window, session type (one-time vs repeating), and timezone before moving on to Advanced options.
Configure Advanced Options
After the schedule is set, the next step is Advanced Options.
This part gives us more control over how the session is configured before it goes live. The setup flow keeps it simple: review the advanced settings, adjust what you need, and then move forward to create the session.
Once everything looks right, click Create to add the session.
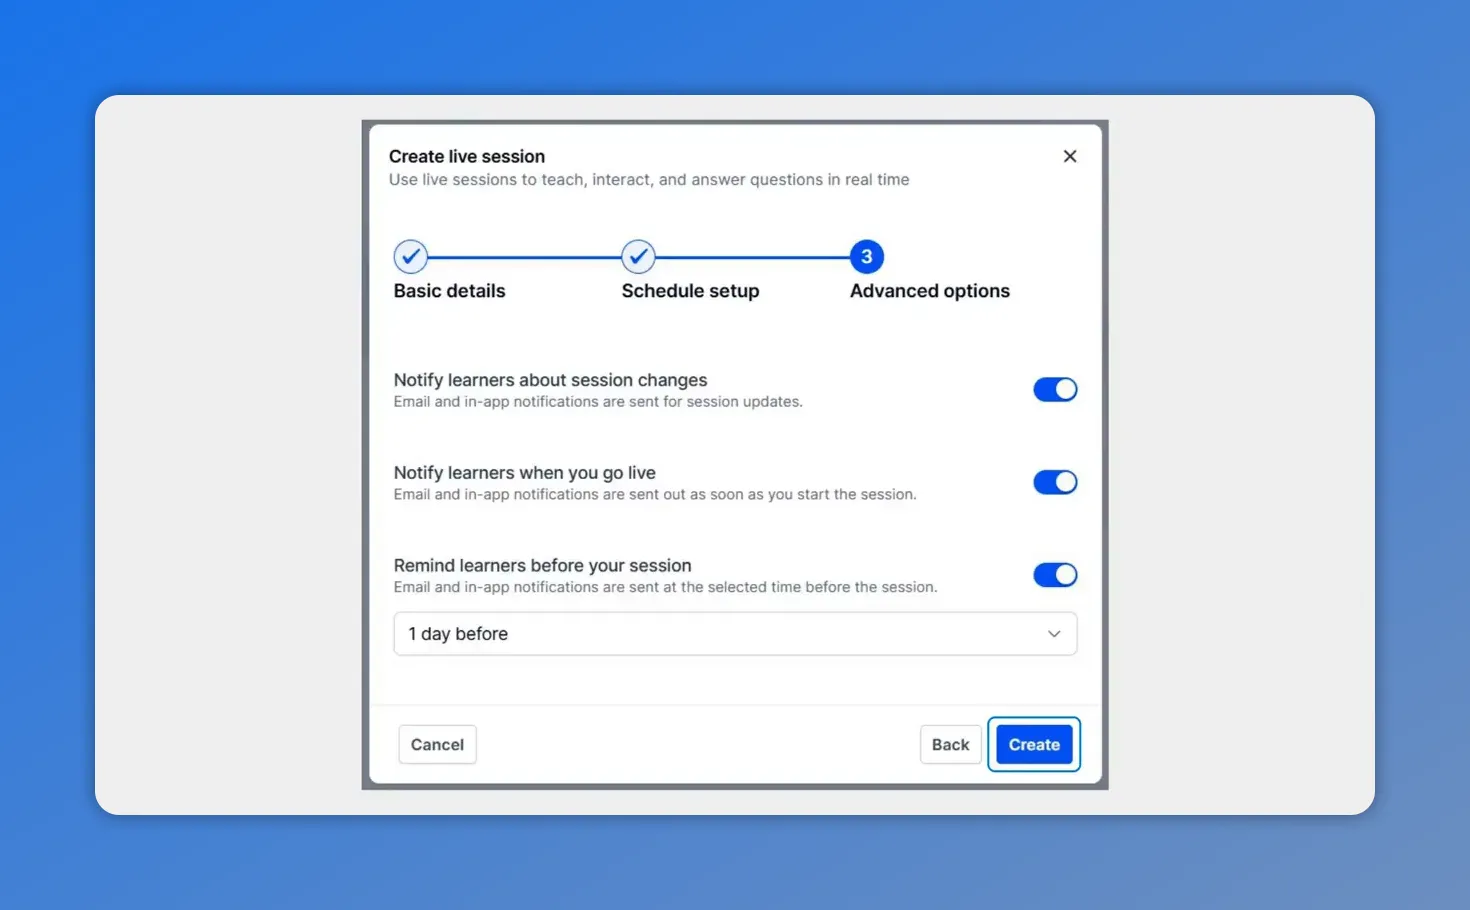
In Advanced Options, you can control notifications—like reminding learners before the session and letting them know when details change.
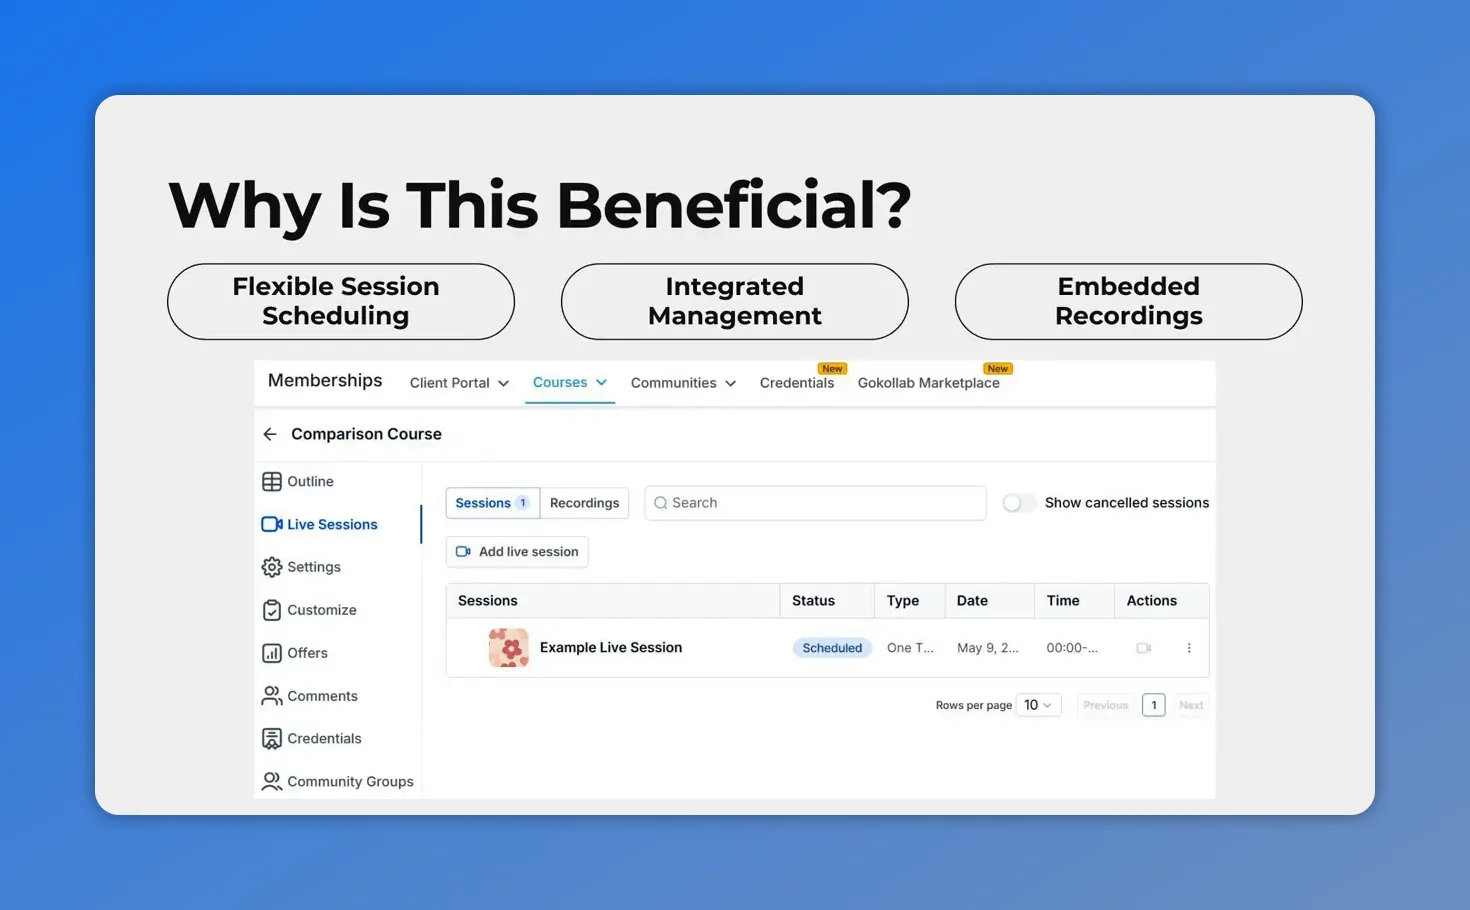
Publish and manage upcoming sessions
After a session is created, it becomes part of the course's live learning experience. From there, we can manage the schedule as needed.
That matters because plans change. And when they do, Live Sessions are built to handle updates without creating extra work.
Based on the feature set described for this tool, we can manage upcoming sessions by:
Editing a session when details need to change
Canceling a session if needed
Applying updates to one occurrence or all upcoming sessions for recurring events
That kind of integrated management keeps the course organized and reduces confusion for learners.
Use recordings to extend the value of each session
One of the strongest parts of this workflow is that the live session does not end when the meeting is over.
Recordings stay connected to the learning experience. That means we can access the recording, download it, and attach it back into the course as a lesson so learners can revisit the material later.
This is especially useful when:
Someone cannot attend the live session
Learners want to review key points at their own pace
We want every live event to become part of the course library
That is what makes the workflow practical. We are not just hosting live sessions. We are turning live teaching into reusable course content.
What makes this workflow simpler
Live Sessions bring several moving parts into a single process. Instead of jumping between tools, we can manage the full live learning cycle from one hub connected to the course.
That includes:
Scheduling
Hosting
Notifications
Learner access
Recordings
Bringing those together reduces tool switching and keeps the learner experience more consistent from start to finish.
This is the “why” behind Live Sessions: learners can schedule flexibly, you can manage everything in one place, and recordings stay embedded in the course.
A simple way to get started
If we want to start using Live Sessions right away, the path is straightforward:
Open the course
Add a Live Session
Name it and add a thumbnail if needed
Set the date and time
Review Advanced Options
Create and publish the session schedule
From there, we can host the session, manage changes when needed, and reuse the recording inside the course.
FAQ
Where do we add a Live Session in a course?
Go to the Courses product tab, open a course for editing, switch to the Live Sessions tab, and click Add Live Session in the top right corner.
What details are required when creating a Live Session?
Start with the session name. A thumbnail can also be added if desired. Then enter the date and time details, review the Advanced Options, and click Create.
Can Live Sessions be used for recurring events?
Yes. Live Sessions can be used for one-time events or recurring sessions, which makes them useful for workshops, weekly training, or ongoing office hours.
Can we update or cancel sessions after they are created?
Yes. Upcoming sessions can be managed after setup. Changes can be made when needed, including edits or cancellations, and recurring sessions can be updated for one occurrence or all upcoming ones.
What happens to the recording after a live session ends?
Recordings can be accessed, downloaded, and attached back to the course as a lesson so learners can watch later.
What is the main benefit of using Live Sessions inside Pinnacle courses?
The biggest benefit is having one connected workflow. Scheduling, hosting, notifications, learner access, and recordings are managed in a single hub, which makes live teaching simpler and more organized.
This article was created from the video How to Set Up Live Sessions in Your Course: Plan, Host, Record