


How to Customize Contact Pages with Role-Based Views
A contact page should give each team member the information they need to help customers, without extra clutter or sensitive details getting in the way.
That is exactly why contact page customization matters. Instead of forcing everyone to work from the same fixed layout, Pinnacle lets us create role-based contact detail views that match how different teams actually work.
The goal is simple: show the right information to the right people in a cleaner, easier-to-use layout.
Why customize the contact page?
When every user sees the same contact page, a few problems show up fast:
Important fields can get buried under less useful information.
Teams may spend more time clicking around to find what they need.
Non-essential or sensitive data may be visible when it does not need to be.
The page can feel crowded, which slows down daily work.
With contact page customization, we can fix that by building layouts around specific roles and workflows. That means support, sales, and management can each work from a contact page that fits their needs.
This improves focus, simplifies navigation, and helps teams move faster without unnecessary distractions.
Where to find contact page customization in Pinnacle
The setup starts inside the Contacts area.
Go to Contacts.
Open the Smart Lists tab.
Click the three-dot menu.
Select Settings.
Choose Customize contact detail view.
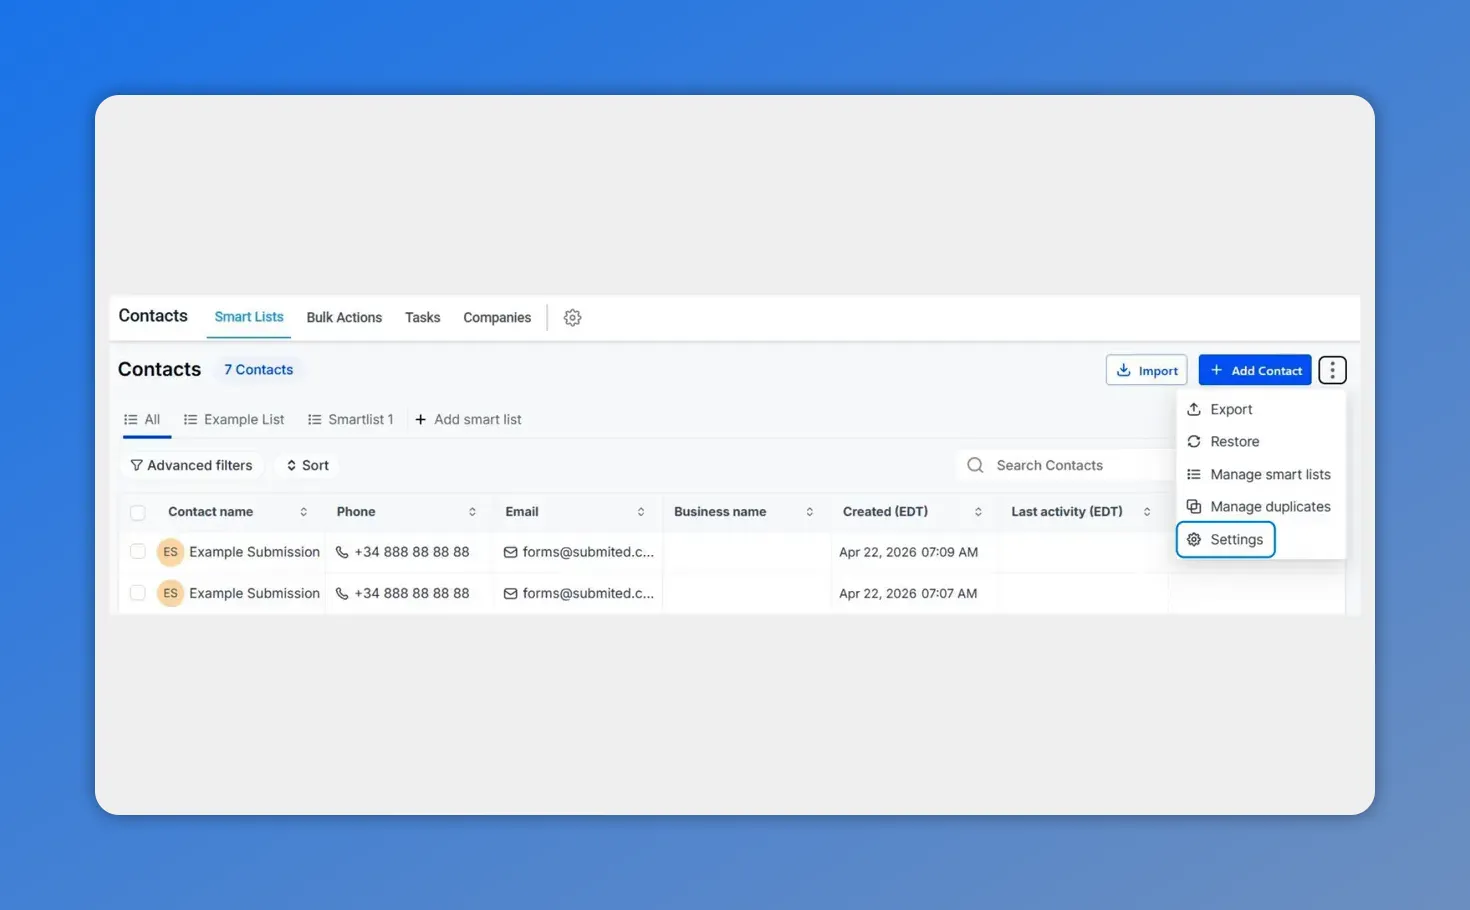
In the Contacts area, open the Smart Lists menu and select Settings—this is where customization for contact detail views begins.
From there, we can either create a new view or edit an existing one.
How to create a new contact detail view
If we are building a fresh layout, the process is straightforward.
Select the option to create a new view.
Enter a clear name for the view.
Choose which users will use it.
Click Create.
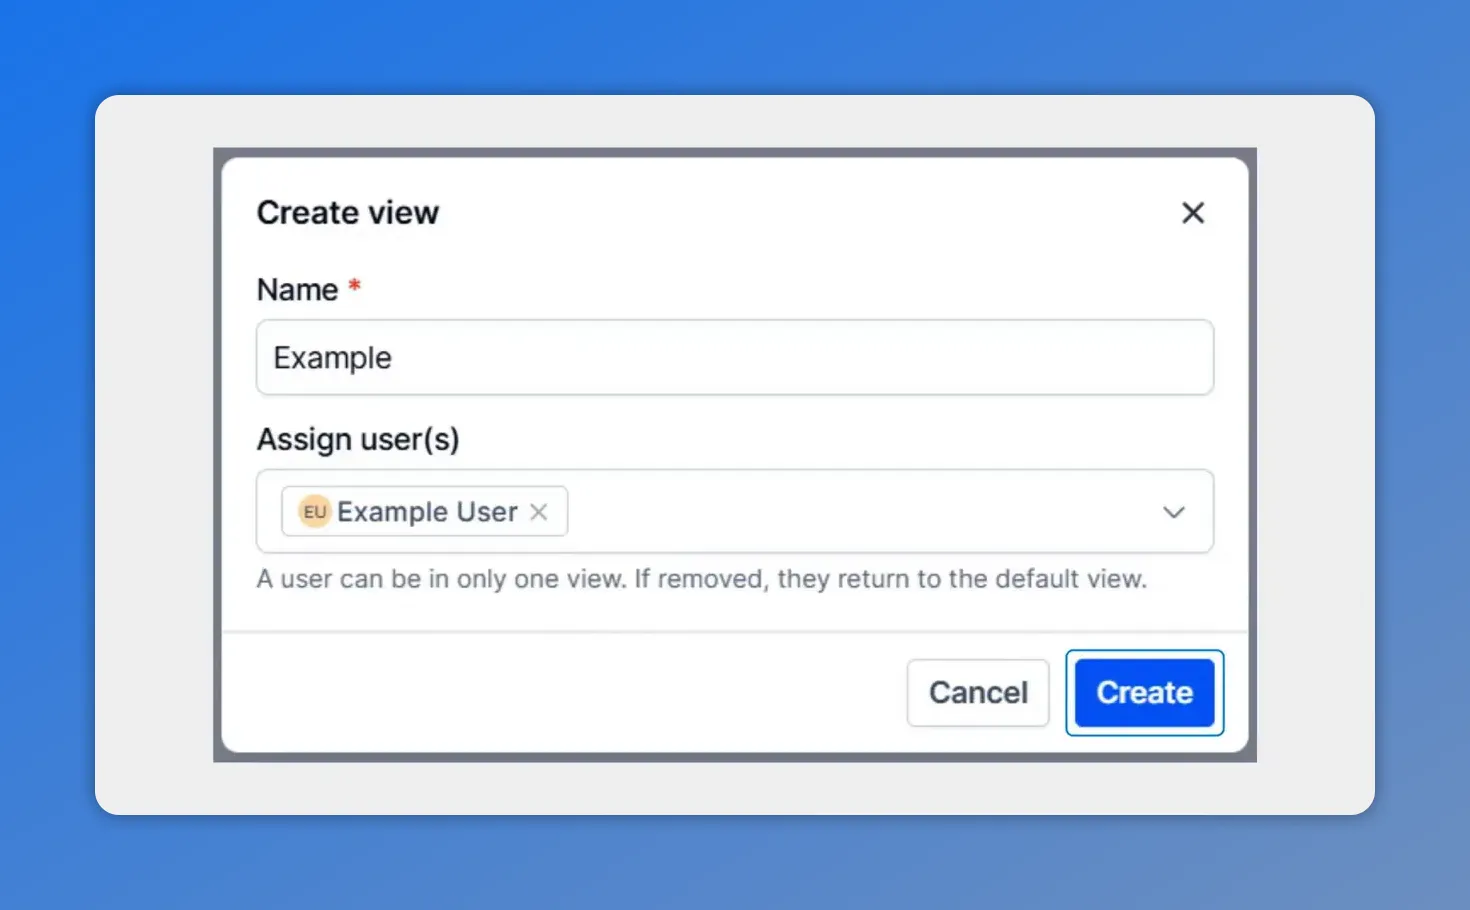
In the “Create view” dialog, you enter a role-based name and select which users will use the new contact detail view before clicking Create.
Naming matters here. A simple, role-based name makes the view easier to manage later. For example, the name should clearly reflect who it is for, since views can be assigned and changed over time.
The key step is user assignment. This is what turns a standard layout into a role-based contact page. Different users can work from different views, so each group sees the information that supports their responsibilities.
How to design the layout
Once the view is created, we can shape the contact page to match the way the team works.
Pinnacle gives us a few key controls:
Rearrange modules to put the most important sections first.
Choose panel structures to create a cleaner page layout.
Select display formats so the information appears in the most useful way.
After making the changes, click Save when the layout looks right.
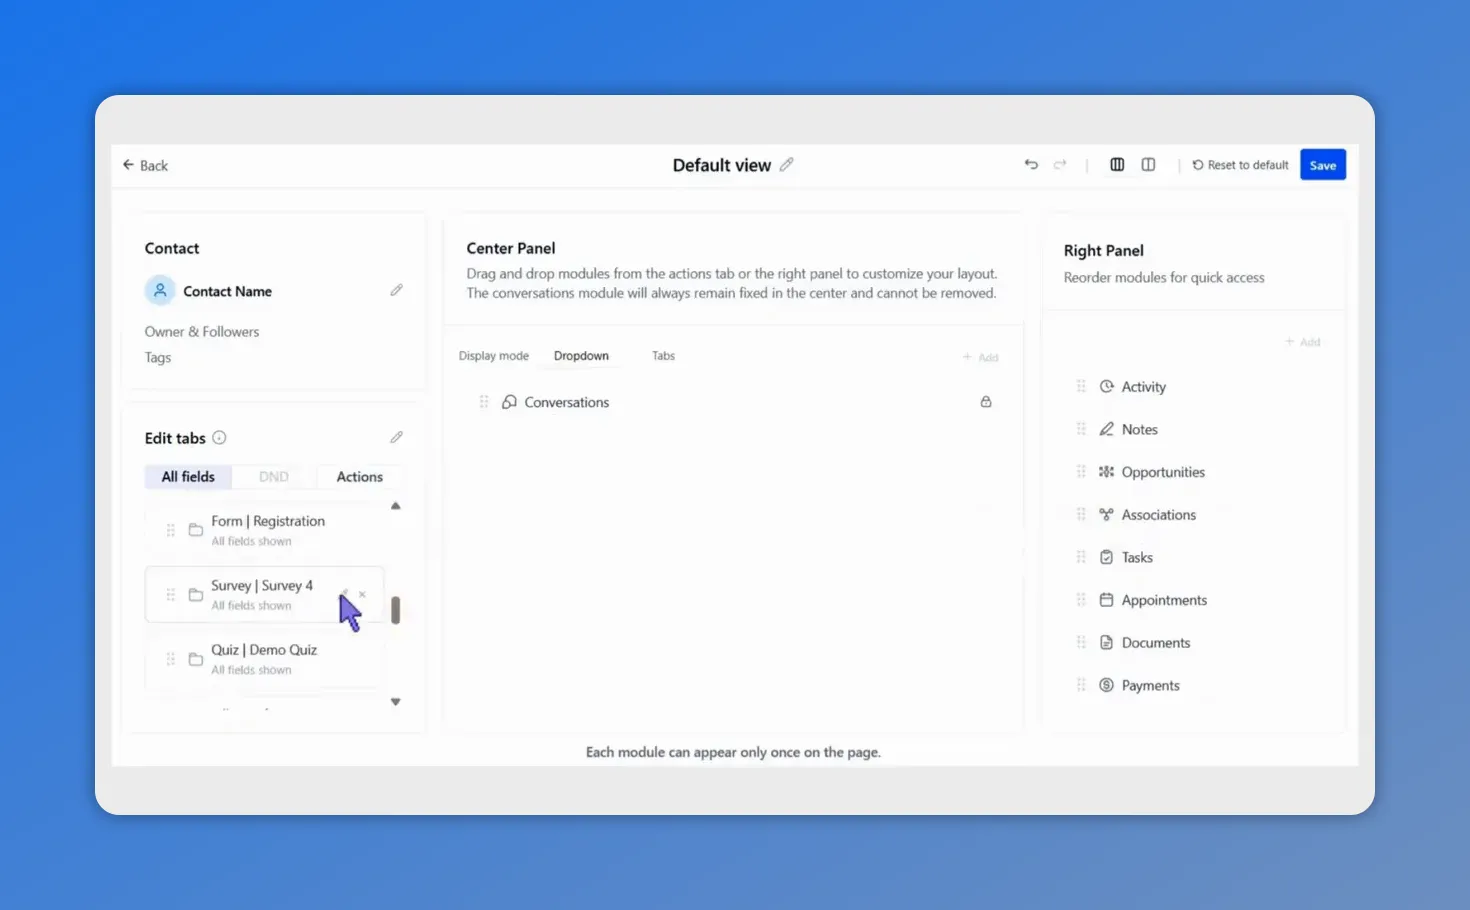
In the layout editor’s Contact section, you can select different field modules (like forms or surveys) to include in the role-based contact card.
Rearranging modules
Rearranging modules helps us control what gets attention first. If a team depends on quick access to contact methods, those sections should be easier to reach. If another team needs custom fields or folder information more often, those can be moved higher in the layout.
This is one of the easiest ways to reduce friction. Teams should not have to scan a long page to find their most-used sections.
Choosing panel structures
Panel structure affects how information is grouped and how easy it is to scan. A cleaner structure makes the page feel more organized and more intentional.
Instead of treating all fields the same, we can group related information together so the page feels more natural to use.
Selecting display formats
Display format matters because good information is not just about what is shown. It is also about how it is shown.
If the formatting supports quick reading, teams can understand the contact record faster and spend less time sorting through details.
What to prioritize on the contact card
A strong customized contact page is not about adding more. It is about showing the right details clearly.
We should enhance the contact card with the information teams use most, while hiding fields that do not support their day-to-day work.
In practice, that often means prioritizing items like:
Email
Phone
Relevant custom fields
Folders or sections tied to that user’s workflow
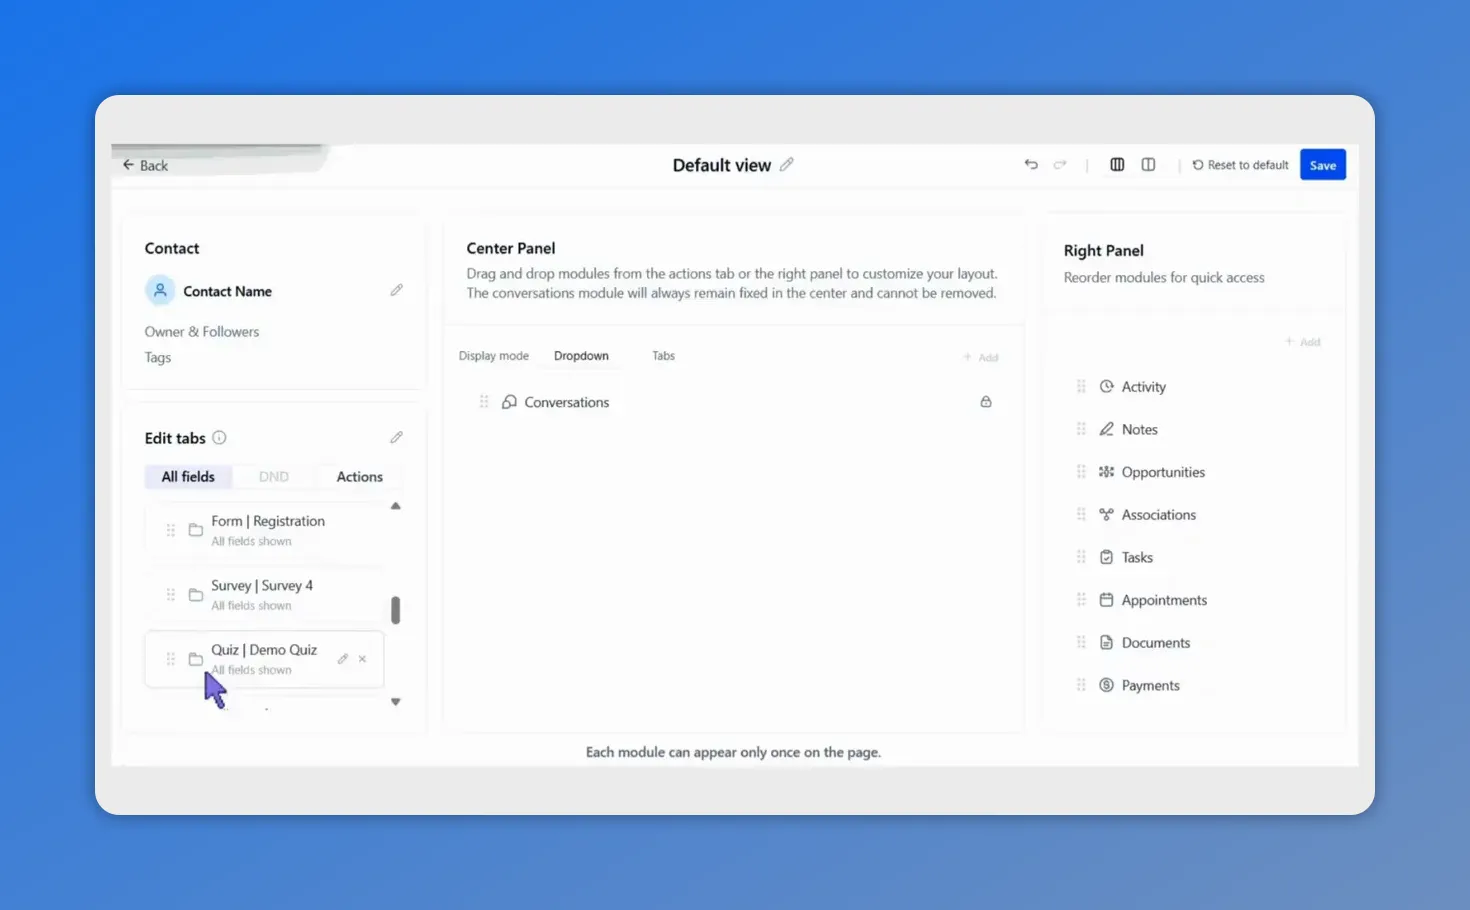
Here, you can see the contact detail view editor with the contact fields on the left, conversations in the center panel, and quick-access modules on the right—this is the kind of layout you can trim down and reorder for each role.
At the same time, we should reduce clutter by hiding non-essential fields. That keeps the page easier to navigate and more targeted to the role using it.
A cleaner contact page helps teams stay focused on useful information instead of scrolling past noise.
How role-based views improve productivity
Role-based views are useful because not every team needs the same customer details at the same time.
When the layout matches the role, the contact page becomes easier to use. That leads to practical benefits:
Faster service: important customer information is easier to find.
Less clutter: non-essential fields stay out of the way.
Better focus: users see the sections that matter most to their work.
Improved navigation: the page is simpler and more predictable.
Small layout changes can have a big effect on daily efficiency. If teams use contact records all day, even a modest reduction in clicks and scrolling can make work smoother.
Reassigning and unassigning customized contact pages
One of the most practical parts of this feature is flexibility.
Customized contact pages can be reassigned or unassigned as needed. That means we are not locked into one setup forever.
If responsibilities change, if a team grows, or if workflows shift, we can update who uses each view. This makes it easier to keep the system aligned with real work instead of forcing users to adapt to an outdated layout.
That flexibility helps teams stay focused on the tasks and information that matter most.
Best practices for cleaner contact detail views
When building a customized contact page, a few simple guidelines go a long way:
Start with the user’s role. Build the layout around what that team needs most often.
Keep key information near the top. Surface the fields that support fast action.
Hide what is not useful. If a field does not help that role, remove it from the view.
Group related information together. A clean structure improves scanning and reduces confusion.
Review assignments regularly. Reassign or unassign views as teams and workflows change.
The best contact detail view is not the one with the most data on screen. It is the one that helps a team do its job with less effort.
Make the contact page match how your team works
Contact page customization in Pinnacle gives us a better way to organize customer information. Instead of using one fixed contact page for everyone, we can create role-based views that are cleaner, more useful, and easier to navigate.
By rearranging modules, choosing the right panel layout, selecting display formats, and assigning views to the right users, we can build contact pages that support real work without clutter or unnecessary exposure to sensitive details.
If the current contact page feels crowded or too generic, this is a simple place to improve the experience for the whole team.
FAQ
Where do we access contact page customization in Pinnacle?
Go to Contacts, open the Smart Lists tab, click the three-dot menu, choose Settings, and then select Customize contact detail view.
Can we create different contact page views for different users?
Yes. We can create a new contact detail view, name it, and assign it to specific users. This allows different roles to use different layouts.
What can we change in a customized contact page?
We can rearrange modules, choose panel structures, and select display formats. These options help us build a cleaner and more targeted layout.
What information should be prioritized on the contact page?
We should prioritize the fields and sections teams use most often, such as email, phone, relevant custom fields, and important folders or workflow-related sections.
Can customized contact pages be reassigned later?
Yes. Customized contact pages can be reassigned or unassigned as needed, which makes it easier to adapt as teams and workflows change.
Why are role-based contact views useful?
Role-based views reduce clutter, improve navigation, keep important details easy to find, and help teams stay focused on the information that supports their work.
This article was created from the video How to Customize Contact Pages with Role-Based Views